 |
Switch between Auto and Manual control modes. Keep in Manual. |
 |
Select spindle forward (CW tool) |
 |
Select spindle reverse (CCW tool) |
 |
Start spindle |
 |
Stop spindle |
The Machine Home position is fully Z+ (ram up) and X+ (saddle right)
You can control table ("spindle") rotation and direction manually with jog panel keys and the clutch. Speed is controlled solely with the gear shifters on the front of the table base.
Note that table direction is judged by tool direction. "Forward" or "Clockwise" is the direction you would run a standard twist drill. This is opposite how you would judge "clockwise" and "counterclockwise" if you were looking at the face of the table.
On this machine, the spindle should always be in Manual mode. You will start and stop the main motor manually, using the Spindle Start and Spindle Stop buttons on the jog panel, when needed. You then engage and disengage the clutch, using the clutch/brake lever on the table base, when you want the table to start and stop rotation.
|
Switch between Auto and Manual control modes. Keep in Manual. |
|
Select spindle forward (CW tool) |
|
Select spindle reverse (CCW tool) |
|
Start spindle |
|
Stop spindle |

Arm movement is powered by an AC motor on top of the column, which turns the elevation screw through a right-angle gearbox.
You can jog the rail up and down manually whenever Emergency Stop is released.
You will need to loosen the arm clamps before moving the arm,
and tighten them again before cutting.
G28 Return Point
Most CNC programs will return the axes to the G28 return point (return point #1) at the start and end of a job, and during tool changes. The control will also move to that position if you press the Tool Check key while no program cycle is running (e.g. during setup and manual operations).
By default, the position for the G28 return point is machine zero: ram all the way up, carriage all the way right.
If tooling or the workpiece temporarily prohibits moving all the way to machine zero, you can change the X and/or Z position for G28. To do so:
In addition to the console jog panel, the machine is equipped with a Centroid CWP-4 wireless MPG handwheel pendant. The handwheel pendant can be used for axis jogging and for cycle start, feed hold, and table motor control.
To use the MPG pendant, first press its silver power button. The display on the pendant should show a copy of the DRO axis position display.
To move an axis using the handwheel:
The handwheel can also be used as a feedrate override control.
To adjust feedrate, turn the increment-select knob to FEED, then turn the wheel CW to increase the feedrate override, or CCW to decrease the feedrate override.
NOTE: if you use the CWP-4 handwheel to change the feedrate override setting, this takes precedence over the position of the knob on the console jog panel. However, as soon as you turn the knob on the console jog panel again, then its setting will take over. This could cause an abrupt change in axis speed, especially if you had used the CWP-4 wheel to turn the feedrate override down.
In addition to the MPG handwheel, the CWP-4 pendant has Cycle Start, Feed Hold, and Tool Check keys. These keys function the same as the equivalent keys on the main jog panel.
There are two axis jog keys: "JOG +" and "JOG -". These keys will jog whichever axis is selected with the axis-select switch, in the jog mode (FAST/SLOW) that is selected on the main jog pendant.
There are four customizable Macro keys. As of May 2022, none of these keys are have assigned functions.
The CWP-4 pendant relies on a USB-connected wireless transceiver. This transceiver antenna sits on top of the console, and should be plugged into one of the console USB ports.
The CWP-4 pendant requires two AA batteries. The battery compartment is on the back, underneath the protective rubber cover.
| M0 | Stop (wait for Cycle Start) |
| M1 | Optional Stop (wait for Cycle Start) |
| M2 | Program Restart (with wait for Cycle Start) |
| M3 | Spindle CW / Forward* |
| M4 | Spindle CCW / Reverse* |
| M5 | Spindle Stop** |
M functions M91 and above are used internally in custom macro programs, but are generally not used directly in user machining programs.
See Chapter 11 of the Centroid T-Series Operator's Manual for descriptions of the higher-numbered M functions.
* On the Berthiez, M3 and M4 do not actually start the motor or table. They only check to see that the motor is running, and that the clutch is engaged. If needed, a message will appear on the screen prompting you to start the motor and/or engage the clutch, then to press Cycle Start.
** On the Berthiez, M5 does not do anything at all, but it is a legal code.
Machine Parameters Summary
The following parameters on the Centroid Machine Parameters table are used for features specific to this machine.
| Parameter | Meaning | Value | Notes |
|---|---|---|---|
| P57 | Load meter display | 3 | Show meters for both axes |
| P750 | Gearbox lube pressure startup time (ms) | 10000 | Allowed time for oil pressure to build up after starting table and pump motors, before triggering error |
| P750 | Gearbox lube pressure ride-through time (ms) | 2000 | Allowed time for oil pressure dip while spindle is running, before triggering error |
| P991 - P992 | Servo load meters scale (Volts) | -2.5 | Analog volts from Yaskawa servo drives, for full-scale motor load |
For all other Machine Parameter functions, see Chapter 12 of the
Centroid T-Series Operator's Manual.
Yaskawa Servo Drive Parameter Settings
Most servo drive parameters are set to factory defaults.
The following parameters are set to values other than factory defaults:
| Parameter | Value | Meaning |
|---|---|---|
| Pn000 | 0010 | Position control mode |
| Pn002 | 0100 | Use absolute encoder as incremental |
| Pn170 | 1400 | Disable tuning-less function |
| Pn200 | 0004 | Position control by A/B phases, 4x multiple |
| Pn20E | 1048576 | Electronic gear ratio numerator |
| Pn210 | 32768 | Electronic gear ratio denominator |
| Pn212 | 8192 | Encoder output cycles/revolution |
| Pn50A | 8101 | Disable P-OT input |
| Pn50B | 6548 | Disable N-OT input |
| Pn50E | 3200 | Remove /COIN and /V-CMP from output SO1 |
| Pn50F | 0100 | Put /BK (brake release) on output SO1 |
See the Yaskawa Sigma V series user manual for detailed
information on these and other servo drive parameters.
Troubleshooting
Any time the control cannot complete its tasks normally, it will display a message in the scrolling message box, in the upper right corner of the screen, explaining what went wrong. You can use the touchscreen or a mouse to scroll up (back) in the message box to view the most recent 10 or so messages.
You can view older messages in the error message log, accessible from the F7/Utility menu:
Most common messages are described in Chapter 13 of the Centroid T-Series Operator's Manual.
The machine-specific PLC program can generate several of its own
fault, error and warning messages, in
addition to those listed in the Centroid operator's manual.
The machine-specific messages are listed later in this section.
PLC Diagnostic Display
You can use the PLC Diagnostic display on the console to view some of the Centroid PLC input, output and memory locations mentioned with these fault and error conditions. At the control's main screen, press Alt-I to activate the PLC Diagnostic display. Press Alt-I again to dismiss it.
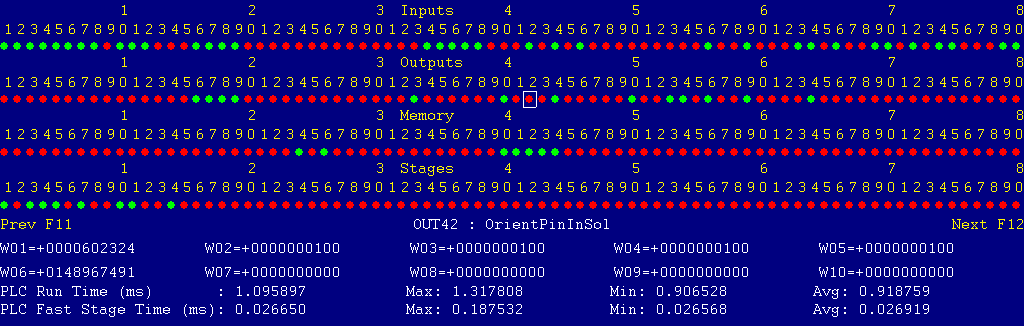
Each page of the Diagnostic display shows four rows of red and green dots: the first row shows PLC inputs 1 through 80; the second row PLC outputs 1 through 80; the third row PLC memory bits 1 through 80; and the fourth row PLC program stages 1 through 80.
You can use the arrow keys to move a highlight box over any of these locations. The name of the highlighted location will be displayed in the center of the screen below the red and green dots.
For example, in the illustration above the highlight box is on Output #42: The dot below the 2, to the right of the superscript 4, on the second line.
Below the four rows of bit status information are ten numeric ("word") variable values, labeled W1 through W10. Some of these variables also hold useful status information, described with the error and fault conditions to follow.
There are multiple pages of Diagnostic data. With the Alt-I diagnostic display showing, you can use the F12 and F11 keys to scroll right and left. For example, pressing F12 once will shift to the page showing inputs and outputs 81 through 160, and word variables W11 through W20.
Messages with 9000-series message numbers are Faults. After resolving the problem, you must press and release the Emergency Stop button to clear a Fault.
Messages with 8000-series message numbers are Errors. Errors will cancel the program cycle and stop the spindle motor, but they do not then need to be explicitly reset.
Messages with 5000-series and 2000-series message numbers are Warnings
and Informational Messages. They do not cancel the cycle or require
any action to reset.
Opening the Control Cabinet Doors
In some cases, it may be necessary to open the control cabinet doors while power is on. For example, servo drive fault conditions can be more readily identified using the codes displayed on, or stored in, the drive units themselves.
WARNING: Use appropriate caution when working in the control cabinets while power is on. Lethal voltages, up to 480VAC and 700VDC, are present on many components.
To open the right-hand control cabinet door while power is OFF:
To open the right-hand control cabinet door while power is ON:
When closing the right-hand door, make sure that the main breaker operator shaft properly engages the switch handle in the door.
The control detected an internal error in processing the PLC logic program.
Report this error to your dealer, along with the values from W14 and W15. Also report what function the machine was performing when the fault occurred.
You must shut down and cycle the power to clear this fault.
References:
PLC W14: Copy of internal SV_PLC_FAULT_STATUS, indicating the type of problem
PLC W15: Copy of internal SV_PLC_FAULT_ADDRESS, indicating the location of the problem

The main table motor tripped its overload protector (OL1).
Check the overload, high on the right panel, for a trip indication.
Press the blue button on the overload to reset it. You may have to wait several minutes for the overload to cool before it can be reset.
Press and release emergency stop to clear the fault condition.
References:
PLC INP10: Trip indication from OL1.  Red = 0 = Okay, Green = 1 = Tripped
Schematic: Lines 3, 91, 117
The control unit detected loss of communication from the operator panel in the console.
Check for damage or disturbance to the cables between the console and the Oak control unit in the control cabinet.
Press and release Emergency Stop to clear the fault.
References:
Schematic: Lines 63, 80
The operator panel reported back to the control unit a loss of communication from the control unit. This indicates the return signal from the operator panel is functioning normally, but the outgoing signal may have problems.
Check for damage or disturbance to the cables between the console and the Oak control unit in the control cabinet.
Press and release Emergency Stop to clear the fault.
References:
Schematic: Lines 63, 80
You exited the CNCT control software without first pressing Emergency Stop.
Always press Emergency Stop prior to exiting the control software.
Press and release Emergency Stop to clear the fault.

The gear lube pump motor tripped its overload protector (OL3).
Check the overload, low on the right side of the panel, for a trip indication. Check the oil pump and reservoir for possible causes of overload.
Press the blue button on the overload to reset it. You may have to wait several minutes for the overload to cool before it can be reset.
Press and release emergency stop to clear the fault condition.
References:
PLC INP14: Trip indication from OL3.  Red = 0 = Okay, Green = 1 = Tripped
Schematic: Lines 20, 93, 115
The arm elevation motor tripped its overload protector (OL2).
Check the overload, low on the right side of the panel, for a trip indication. Check the arm clamps, gearhead and screw for possible causes of the overload.
Press the blue button on the overload to reset it. You may have to wait several minutes for the overload to cool before it can be reset.
Press and release emergency stop to clear the fault condition.
References:
PLC INP13: Trip indication from OL2.  Red = 0 = Okay, Green = 1 = Tripped
Schematic: Lines 17, 34, 93
The PLC program requested display of a message on the screen, but the provided message code was not valid.
This indicates an error in the PLC program. Report the message to your dealer, along with the value in PLC variable W16.
References:
PLC W16: stores the invalid message code
A previous servo drive fault condition has been resolved, and cleared with Emergency Stop.
A previous PLC fault condition has been resolved, and cleared with Emergency Stop.
You inadvertently pressed a keyboard combination that is used for keyboard jogging controls, but keyboard jogging features have been disabled on this machine.
A previous fault condition has been cleared with Emergency Stop.
The order of the axis drives; order of the axis definitions in the control configuration menus; and order of the axis jogging controls can vary. Definitions for this machine are as follows:
| Axis | Axis # | Drive # | Drive-Okay Bit | Jog Keys | MPG Position |
|---|---|---|---|---|---|
| Z | 1 | 1 | MEM16 | Z | 3 (Z) |
| X | 2 | 2 | MEM17 | X | 1 (X) |
19-May-2022 MBL
![]()